BUSINESS CARD
Size of the business card:
3.5" x 2"
Hi class!
I hope your weekend was great.
For tomorrow's class we are going to work on your "Business cards". We are going to work them using a lot of Illustrator and a little bit of Photoshop.
If you can bring models of business cards that you would like to learn how to make please bring them to the class.
If you have digital pictures of you (close ups work better, or id pictures if you don't have regular ones) or any picture of idea or logo that you would like to have , bring them to the class (or have it in your e-mail or somewhere in the web to download them to your computer). Try not to bring anything to scan in the class because the scanner sometimes causes a lot of trouble and takes a lot of time to scan pictures in the class.
See you tomorrow,
u.
2.25.2008
2.19.2008
PHOTOSHOP (Paste into) & BART/ Exercise Illustrator/Pathfinder/ Effects/Shadow

Filling text with pictures
Using the Paste Into option
Photoshop
Create a New Document
Photoshop>File>New
SIZE: 12 inches width/3 inches height/ White Background/ RGB
Select the Type Tool
Type YOUR NAME (Size: Between 110-120 points)
Font: Gill Sans Bold
Select up to three (3) pictures form the web. High Quality. (You can use the tool Google Images>Large Images)
1. You copy the picture that you want to past into the Text
(If it is the whole picture you just use the Apple+A and then, Apple + C (Copy) )
2.Select the letter or letters that you want to fill. Because they have the same color you can use the Wand tool
3. Paste the picture INTO the letters (Photoshop>Edit>Paste Into)
4.You can modify the size of the picture,s the colors, you can apply filters according to your creativity.
5. Give the letters a stroke 10 px. (any color) Photoshop>Edit>Stroke>
5.Flatten Image (Photoshop>Layer>Flatten Image)
6.Crop any excessive background (Crop tool)
6.Save as jpg.
7.Upload the image to your blog


2.14.2008
New fonts?

You can get new fonts for your projects. This is one of the many web sites you can get fonts:
www.dafont.com
CLASS 2/ FEBRUARY 19

THE ADOBE ILLUSTRATOR Tools BOX:


Exercise using the Pathfinder window.

Exercise using Effects (Efects>Stylize>Drop Shadow)
When using the Drop Shadow effect, use the measurements by default

2.05.2008
FIRST CLASS/ February 5, 2008
Exercises using Photoshop tools.
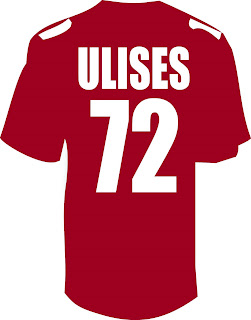
1. Choose one of the following two pictures
2. Click on them to open the real size picture
3. Drag the picture to the Mac's desktop
4. Open the picture from the Application Photoshop
5. Use the magic wand tool to select the Blue T-Shirt without the number and name
6. Use the bucket tool to paint the T-shirt with a different color (or Image>Adjustments>Curves/Levels)
7. Use the magic wand tool and the bucket tool to fill the number and the letters of the name on the T-shirt (each number with a different color)
8. Use the eye dropper tool to select the blue color of the T-Shirt and fill the letters and the numbers with the same color of the T-shirt (You can use the eraser tool to fix any imperfection)
9. Use the Type tool to write your own last name and your own number on the T-Shirt
10.You can use any kind of font and color
11. If you have questions, please ask the instructor.
12. Very important: SAVE YOUR WORK EVERY 3-5 MINUTES (Apple + S)
13. Have FUN.
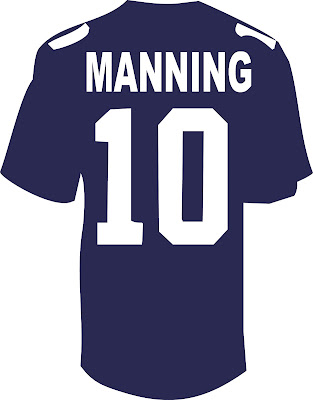


2.04.2008
First class/Cleaning a picture using Photoshop

1.To work the pictures on this blog, first you have to drag them to your Mac's desktop. Click on the picture and you'll see the original photo (real size). With your mouse, drag the picture to the computer's desktop.
2.Open the program PHOTOSHOP (usually it is in the folder APPLICATIONS). From Photoshop open the picture that is on the computer's desktop.
It is very important that you SAVE your work every 3-5 minutes.
YOU SHOULD CREATE A FOLDER with your name on the desktop and drag everything that you work in class into that folder. If you use pictures from the Internet, DRAG THE PICTURES INTO THAT FOLDER. (This is particularly important when you are working with Quark Xpress)
At the end of EVERY CLASS, please get your work in your flash driver OR in your BLOG. IT IS NOT 100% sure that if you leave the work that you did in class it will be on the desktop the next class. PLEASE SAVE YOUR WORK EVERY 3-5 MINUTES. That way you won't loose important work and time.

PHOTOSHOP>IMAGE>MODE>GRAYSCALE

USE THE Zoom tool and the Clone Stamp tool to clean the following picture

Using Photoshop tools/ February 4th.
Photoshop> Image>Adjustment>Curves (or Levels)


Use the Clone Stamp Tool to clean this picture.


Use the Clone Stamp Tool to clean this picture.


Subscribe to:
Posts (Atom)
