2.28.2007

Create your own Business Card and a Postcard

Create a business card with your logo.
LOGO, create a logo and present it inside an A4 illustrator document. White background
Post it on your blog. 3 to 5 lines describing how you created your logo, the tools you have used, etc.


BUSINESS CARD
Size of the business card:
3.5" x 2"

1*using a picture as background. (Could be your picture) with your logo
2*using a logo over white
3*using a color logo over another color as a background

Information, Name of the company (could be part of the logo). Position in the company, e-mail address

Size of the postcard
4" x 6"

1) Spring in the Bronx. Any picture as a background (use duotones and color mixed)
2)Mother's day Use Photoshop>Filter>(Artisitic or Blur or Sketch or Brush Strokes, etc..)
Over the postcard create a 3 words phrase, do it using Illustrator, change the colors, the strokes, use the pathfinder tool)
3)Post it on your blog
Quark Xpress Basic Windows

2.14.2007

ILLUSTRATOR TOOLS


PHOTOSHOP EXERCISE (black and white)


Use the Photoshop tools to paint Barts Simpson, try to make it as similar as possible to the original:


Creating a logo using Illustrator (Exercise ONE)

EXERCISE 2 Creating a LOGO using Illustrator


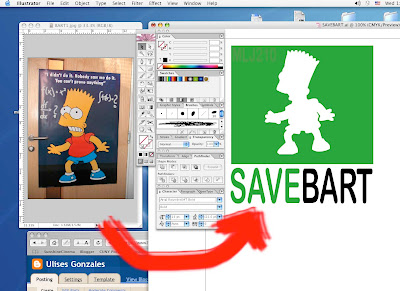
You can see here in the picture above, how starting from an image in pixels (Bart poster) you are able to create a logo in Illustator, using Bart silhouette.

BASICS:
I am working in a New Illustrator document A4 (Apple +N)
The size of the green rectangle is 6 inches W and 5 inches H (Illustrator>Window>Tool>Rectangle)
The color of the green rectangle is 85% C, 100% Y (Illustrator>Window>Color ) or F6
The font of the logo is Arial Rounded MT bold (Illustrator>Type>Font)

STEPS:
1.Open FROM PHOTOSHOP the BART2image here at the end of the post.
2. Select the yellow background with the MAGIC WAND TOOL (Photoshop>Windows>Tools)
3.Select Inverse to select Bart's silhouette (Photoshop>Select>Inverse)
4.Create a path: Photoshop>Window>Path>Make work path from slection
6.Name the path: Photoshop>window>Path>(Name the path: BART)
7.Copy the selection (Photoshop>Edit>Copy)

8.Open a New Illustrator document (Ilistrator>File>New> (A4 size, any orientation)
9.Paste the Photoshop document (Illustrator>Edit>Paste)
-A window is going to open , Paste as> Compound Path (Fully Editable)
-Create a green rectangle (5in H, 6 in. W) Illustrator>Tools>Rectangle. Click on the document and a window is going to show up and you give the size of the rectange ( 6in. W, 5 in. H) and the color C:85 Y:100 (From the Illustrator color pixer)
-Reduce the size of the Bart path to fit inside the green rectangle, and color it with White color inside and No shape
-Write the slogan SAVE BART using the font Arial Rounded MT bold (Illustrator>Type>Font) You can make it bigger or samller to make it similar to the logo above.

2.07.2007

EXERCISE COLORS USING PHOTOSHOP


Use the bucket and gradient tool, the color picker and the foreground color and blackground color to paint this picture.
Save it in a different layer and create a background using a gradient.

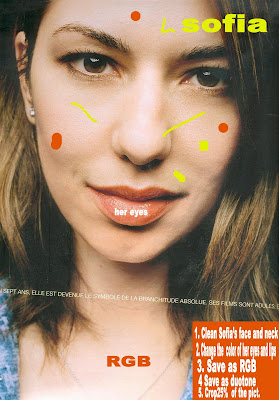
EXERCISE PHOTOSHOP SOFIA COPPOLA


EXERCISE 2

1.Clean the picture using the clone stamp tool
2.Select the eyes and the lips of the picture and change the color of them using the selection tools and the Adjustment>levels, Adjustment>Curves tools. Save your picture as a RGB document
3. change the picture to grayscale and change the color to duotone. Save the document as a duotone picture (Change to RGB to post it on the blog)
4.Crop the color picture. You need just 25% of it. Save it as RGB Print it and justify to the class why you are using that part of the picture.
5. Think about using this picture with a bif logo on it, as a cover of a magazine. (Just think about it! and try to look at other magazines in your way home or in your way to Lehman everyday)

PHOTOSHOP TOOLS


Different kind of tools in Photoshop: Selection tools, lasso, Magic wand, Selection Path, Clone Stamp, Buck, Gradient, Eraser, Type, Eyedropper, Brush and Pencil Tool, Dodge, Sponge, Zoom, Background color, Foreground color, Color Picker.

Create a new document (Apple + N)

Resolution: 300 dpi is High Resolution (lowest the resolution, lowest the quality. A good resolution for the blog should be 180 dpi. The bigger the document, the heavier.

Color Mode: Image> Mode ---CMYK (print) RGB (web and blog)----

Save as: jpeg (compress), TIFF (always when working for a layout in Quark), Photoshop (if you want to conserve the layers)

Flatten image (Layer>Flatten image)

Filter (there are some effects that you have to be in a document as RGB to use)

Adjustment Color: Adjustment> Levels> Curves